Easy Breezy

Easy Breezy
Being creative every day and making it look Easy Breezy!
Showing posts with label DIY. Show all posts

Saturday, August 13, 2011

Chevron - not just a place you get gas!

My friend Amy called me the other day and said she had decided to paint a chevron pattern on one wall of her daughters bedroom, and asked would I help.  I said, sure, sounds like fun!  I arrived at Amy's house at 9 a.m. Friday morning ready to paint!  Coincidentally we had on matching outfits - pink shirts and jean shorts!  I took it as a good sign that we would work in sync all day.  We pretty much did too.  Turns out we are both mathmatically challenged.  Believe it or not, there is a ton of measuring and dividing to do when mapping out a chevron pattern.  We found an article on the internet that made it sound "easy breezy", but these people were clearly rocket scientists! 

After measuring the width and height of the wall and dividing them by three (don't ask me why we picked three, I guess that odd number rule of decorating thing. Whatever, It seemed right at the time.) we started measuring out from the center and placing dots along the wall.  The rocket scientists said all we'd have to do is get our blue painters tape and start connecting the dots to make the zig-zags.  Why what could be easier than that I said!  It should have been easy, but it was not.  Nothing was turning out right.  We ended up ripping off all the tape and starting over. 

The rocket scientists also didn't remind us about the whole taping on the inside of the stripe on one row and on the outside on the other.  Makes perfect sense now, but when you are standing on a cabinet, nose to nose with the wall and looking up at the stripes it was hard to tell.  Finally we made a paper template and basically drew the pattern on the wall and then added the tape. 

We used a magic eraser sponge to get off any pencil marks and then we started painting.  The painting was the easy part. 

We finished the wall at 10 p.m. -  ELEVEN HOURS after we started, but look how cool it turned out! 

It's not perfect.  The paint seeped under the tape in some spots and there is one spot where we taped wrong, but both of those problems are easy fixes.  The important thing is that Amy's teenage daughter loves it.  That is totally worth the crick in my neck I woke up with today!

Places I like to Party

Friday, August 5, 2011

The Baby Made Me Do It

When my sister found out she was expecting last year she and her hubs decided to make it a surprise birthday.  Nobody knew the sex of the baby.  I'm here to tell you that it is super hard to shop for a baby when you don't know the sex.  EVERYTHING is either pink or blue.  Even carseats and strollers are gender specific these days.  When it was time to throw the baby shower I had just finished reading the Twilight books, so of course we had to have a teams at the shower - Team Pink and Team Blue.  We decided, using a proven scientific method, that since there were more people on Team Blue, the baby would definitely be a boy.  Science-Smience! I  was on Team Pink and you couldn't change my mind about it!  Turns out I was right and in early December my bouncing baby neice was born.


Since we were unable to buy baby clothes before the baby arrived (other than some generic sleepers and onesies) I decided to get out my sewing machine and start sewing.  I am not an expert sewer.  I've never had a sewing lesson in my life, but I thought I could figure it out if I tried.  I started out simple with a couple of pillowcase dresses.  Mine weren't made from actual pillowcases, but the actual shape of the dress is a rectangle like a pillowcase.  I got the bloomers pattern from a friend of mine.  I think this is one of my favorite dresses.  I love the fabric! Check out this blog  for a video tutorial and free pattern!
Then I made this one with the contrasting ruffle. 

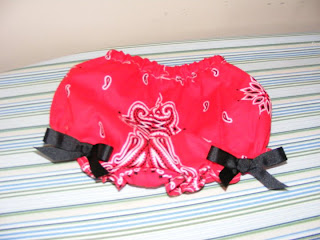
I also made her this bandana dress, which we dubbed the bbq dress, and matching bloomers and bonnet.

I had such success with the bandana dress that I wanted to try something else using bandanas.  So I came up with this cute outfit.


Next my sister picked up some fabric and I made these darling baby shoes  and a matching pinafore dress.  I love this pattern so much!  I bought the shoe pattern off of Etsy.  There are lots of cute patterns for very reasonable prices.

I found the pattern for this dress here . It was free also!  Yay Free!  This was also my first attempt at a button hole and making covered buttons!  Believe it or not, it was Easy Breezy! :)


Then I found this cute peasant dress pattern also on Etsy and with some pink plisse and white eyelet, I crafted this little dress and bloomers.

Oh and I made one more thing using a baby headband and some tulle, that I was sure the baby would need.  I realize that others doubted my logic...

... but I stand by my belief that a baby does need a tutu!

Monday, July 25, 2011

She's a Real Looker!

I am so excited y'all!  I finally finished the ugly chair and she turned out to be a real looker! I am thrilled with how she turned out, especially since this was my first time ever upholstering anything!  She is not perfect by any stretch - there are some things about the paint finish I might go back and tweak, and the seat cushion is not as perfect as it could be, but all in all, I love her!

Remember how she used to look?

Well look at her now!

I ended up using the white gimp to trim out the chair and I love how it looks!  Thanks for the inspiration Miss Mustard Seed 


And don't you just love the monogram!  I think it really makes the chair special.  If you haven't made anything using a painters drop cloth, you really should give it a try.  I love the texture and the color of it.  I even had a little left over that I'm going to use to make a throw pillow.

I learned so much in recovering this chair.  The first thing I learned is that I did not take nearly enough pictures of the before and the during.  You might think you'll remember how things looked, but trust me, you won't.  I'm pretty sure that I did not do the back of my chair how the original was done, but I will never know, because I didn't take a picture of it.  The hardest part of the entire chair was the part you don't even see - the seat bottom under the cushion!  Trying to work around the chair arms and legs was a real bear, but I worked it out and am pleased with the results. 

Now on to the next project!
Ugly Chair #2

There isn't a single thing I like about this chair. The shape is blah, the fabric is dated, it doesn't go with anything in my house.  In fact, I'm not even sure where we got this chair.  I think The Hubs brought it home one day from who knows where!  It sits in my sons room and is usually covered in laundry.  He leaves for college in a couple of weeks, so I will wait until he is gone before I confiscate his chair.  I might do something fun with it like covering it in Georgia Bulldog fabric!  Hmmm.... we'll see.

Come join me at:


Tuesday, July 19, 2011

The Son-in-Law Shirt

I know you are expecting another post about the Ugly Chair, but I am still waiting on the monogram to be finished, so I'm kind of at a standstill. I've made many a New Year's Resolution about not starting a new project before I finish an old one, but to be honest, they seem to go by the wayside along with the lose weight, exercise and save money ones. This was a super quick project that I knew I could finish in a afternoon, so I figured it wouldn't do any harm.

My son in law sent a bag of hand-me-downs to my two teenage sons and there was one shirt that neither of them claimed. I was going to put it in my Goodwill bag, but on further inspection I decided I really liked the fabric and figured there was enough of it to make some really cute pants for a friends new baby boy.

I found this adorable and FREE pattern and tutorial here.


It didn't take long at all to whip up these baby pants and if it hadn't been for the snaps and pocket on the front of the shirt I would have had enough fabric to make a second pair. Then I came across this cutie here . Are these bibs precious or what? And did you see the other projects she made using old button down shirts? So cute!

So I got to work cutting out the bib pattern and in no time at all I had a precious (and free) baby gift.


Okay, I did have to run out and get some coordinating bias tape for the bib, but everyone knows I would have found my way to the fabric store this weekend anyhow. Now I can't wait for the next bag of hand-me-downs. I think I'll be going through it before the boys do!

Join me at:  

Wow Us Wednesday
Photobucket
The Shady Porch

Friday, July 15, 2011

The Ugly Chair Part IV - The Cushion

I am so excited to say, that I have made my first cushion.  I'm not claiming perfection on this thing, but I think it turned out pretty well for my first try.  I layed the foam onto my fabric and traced around it leaving  enough fabric to go half way up the side of the cushion and for the seam allowance, then I cut it out. Next I layed the cording on the right side of the fabric and pinned raw edge to raw edge.  Then using my new handy dandy zipper foot (I'm telling y'all, this zipper foot has changed my life!) I sewed around the entire cushion top so the cording went all the way around.  Check out this tutorial on how to join the beginning and end pieces of the cording here .  Next  I took the bottom piece of fabric, lined it up with the top, right sides facing and sewed around 3 sides of the cushion. 

Just a quick note,  the drop cloth fabric ravels like a big dawg!   Next time I might cut my strips a little wider to cover my cording just to allow for some of the raveling.    


Then I turned the fabric right side out and slipped the cushion inside.  The most tedius part was blind stitching the cover closed.  My original cushion had a zipper so the slipcover could be removed, but I wasn't brave enough to tackle that yet.  Maybe next time.

Here is my lovely new cushion.   It's not perfect, but I'm proud of it.  Ignore the rest of the chair as it is not anywhere near being done. 


I have hit a bit of a snag with the double welt cording for the rest of the chair, so Plan B is to try it with single cording.  If that's not wide enough to do the job then  Plan C is to use gimp.  Gimp is a kind of braided trim. Miss Mustard Seed  uses it a lot on her gorgeous chairs, so I know it will look good on mine too!

Tuesday, July 12, 2011

The Ugly Chair


Well, here we go. Time to tackle the... UGLY CHAIR! I began the "un-upholstering" of the Ugly Chair one bright sunny morning and 1 million staples later I finished on one hot-as-all-get-out afternoon! Let me tell y'all, that fabric and trim was on good! My poor hand was so sore that my fingers couldn't move from their death-grip-on-the-pliers position! I'll be honest, I began to wonder what I had gotten myself into, but after some thought, and some Motrin, and a big glass of sweet tea, I decided I could do this thing! Here are a few pictures of the process. Here is Ugly Chair prior to the un-upholstering.


The fabric is dreadful and the wood finish is from the "I've got geese in neckerchiefs in my kitchen" era, but I've always loved the shape, so I believe there is great potential here. I'll admit, while I was pulling off the fabric I was secretly praying that someone had used this chair to hide their life savings, but instead I found an ice pop wrapper, what is possibly "droppings" of some sort and a dime.


I added the dime to my laundry room All Monies Found in the Washer/Dryer Become Mama's piggy bank and got back to work on Ol' Ugly. Here she is after I stripped the fabric and trim off (except I forgot to take it off the arm rest thingies until after the picture was taken).


The next step was dealing with the wood. I decided after reading many a blog that I would paint that baby white. I've been reading lots of good things about Annie Sloan's Chalk Paint here and I am definitely going to order some for my next project, but I was impatient and decided while I was at Home Depot I'd just grab a couple cans of Rust-oleum Painters Touch in Satin heirloom white. The can said it gave 2x coverage and was ideal for wood, metal, wicker and more! SOLD!
Before I began painting I lightly sanded the wood with a sanding block I had on hand, then wiped it down to remove the dust.  Now, the key to looking good while spray painting is to use pretty pink plastic party table clothes as drop clothes! haha  Actually I was just using what I had left from a baby shower I threw a while back and since they were cheap and I don't know of any other baby showers I'll be hosting anytime soon I decided to use them.  That and I didn't want to run back to the store to buy a drop cloth!

And here she is all painted.

This last picture is a little blurry, but you can see how I sanded some of the paint off to give it a worn look.  That's right, old is the new new!

I'm so happy with how the paint finish turned out. I sanded around the edges to give it a distressed look, wiped it down to remove any dust and then applied a clear wax to seal it. I've got a long way to go, but my ugly chair is starting to look pretty again! Stay tuned for my adventures in covering double welt cording! YIKES!

Monday, July 11, 2011

Getting Started

I guess this is the hardest part - the getting started.  I decided to jump on the blog bandwagon a few weeks ago after reading some awesome blogs out there but I had the hardest time coming up with the perfect bloggy name.  I ruled out names like "Crap Miss Wren Makes" (apparently there is another blog out there about crap somebody else makes  http://www.crapivemade.com/  Check her out, she's a hoot!)  and "I'll Show You Mine if You Show Me Yours" (I thought twice about that one.  There's no telling what people would have expected to see when they logged on!)  I'm not sure that Easy Breezy is the perfect blog name, but it is something I catch myself saying a lot.

So on to the Easy Breezy stuff!  It seems I always have atleast one project in the making - for instance I have decided to try my hand a reupholstery.  I have absolutely no idea what I'm doing, but I've been reading up on it and I think I can pull it off.  Now, I have re-covered the seats of many a dining room chair before, but I've never tackled any thing big like a wingback chair!  I've had this ugly chair for many years.  It wasn't ugly when we got it, but after 18 years that's how it ended up.  It wasn't new when I got it and its been sitting in my garage for the past four years so I figured what the heck, if I ruin it I'll take it to Goodwill.  I actually checked into having it reupholstered but CHA-CHING!  So I've taken the plunge on my own.  Here is the ugly chair (along with a step ladder and a carpet remnant to add to the charm!).

There used to be buttons on the cushion, but three little boys later, they are nowhere to be found.  I probably should have started with something easier that wouldn't require me to learn to make piping with double welt cording (I had never heard of such!), but I figure if I can pull off this chair everything else will be easy by comparison.  Kind of like learning to drive a stick shift - if you can do that then driving automatic is Easy Breezy!

Okay, I've already gotten WAAAAY too long winded  (be warned, this could be an issue!) so I'll hush now, but  I will return with updated posts on the ugly chair!  Thanks for visiting my blog and bear with me as I figure this thing out! :)
view sourceprint? 01 09 10